

How To Create A System Repair Cd For Windows Xp
Windows System Repair – Guide for Windows XP, Vista, 7, viii, 10
This guide shows you how to create a Windows Organisation Repair disc that can be used to repair Windows.
This guide applies for the following Windows versions: XP, Vista 7, 8 and 10.
Contents
- 1 Create a Windows Organisation Repair Disc
- one.1 Create disc for Windows XP
- 1.2 Create disc for Windows Vista
- one.three Create disc for Windows 7
- 1.4 Create disc for Windows 8
- 1.iv.ane Disc as a CD/DVD
- 1.4.2 Disc as a USB flash drive
- one.v Create disc for Windows 10
- 1.5.one Disc as a CD/DVD
- one.5.2 Disc as a USB flash bulldoze
- two More Data
- 2.1 Support Links
- 2.2 Applicable Systems
Create a Windows System Repair Disc
A system repair disc allows yous to boot to the recovery options menu of your Windows version and help you recover and restore your system, if y'all don't accept the original installation disc.
You lot can't install Windows with this kind of disc. To install Windows once more, you need the original installation disc, the CD/DVD/USB used to install Windows.
Create disc for Windows XP
The original Windows XP installation CD itself acts your System Repair disc. There is no split procedure for creating a System Repair disc as you have for Windows Vista, Windows 7, Windows eight or Windows 10 systems.
In order to repair your calculator, yous need to access Recovery Console and perform diverse recovery commands. If these recovery commands practise not work, you'll need to reinstall Windows XP.
If you lot can't boot from the installation CD because of the CD-ROM, you tin employ Windows XP boot disks by using your computer's floppy disk drive to begin the process and proceed with the CD. The bootable floppy disks bypasses the demand for a bootable CD-ROM, only the entire process still requires you to take the installation CD available.
Follow these instructions to use your Windows XP CD to fix your reckoner:
- Insert the Windows XP disk in the CD bulldoze
- Restart your figurer
- Press any fundamental if you are prompted to kicking from the CD
- At the Welcome to Setup screen, printing R to open Recovery Console
- Type your Administrator password
- Command Prompt should now be available
- The post-obit commands might assist fix your computer:
bootcfg /rebuild
chkdsk /r /f
fixboot
- Press Enter later on each control

Windows XP Recovery Console screen
On older computer models, Recovery Console can exist accessed without the installation CD by following these steps:
- Turn on your figurer
- Printing and agree the F8 key during boot
- Wait for the Startup Options screen to announced
- Select Recovery Panel
- Hit Enter
- Enter the administrator password
- Enter the recovery commands from to a higher place
If the recovery commands mentioned higher up do not fix your computer, effort to reinstall Windows XP using the installation CD:
Past reinstalling Windows XP, you lot will delete all your personal files: pictures, music, movies. Backup your computer before you continue.
- Insert the installation CD and restart your computer
- At the "Press whatsoever key" screen, press any key to kicking from the CD
- Press ENTER to enter the setup process
- Read and agree to the license agreement by pressing F8
- Select your current Windows XP installation from the list and so press R
- Follow the instructions to setup Windows XP again.
If you lot can't kicking from the CD, follow these instructions to setup a prepare of Windows XP boot/setup disks (bootable diskette) that can be used by your computer'due south floppy deejay and and then continue the process by using the installation CD:
- Download the necessary setup disks that correspond to the version of Windows XP you have installed:
- Windows XP Home Edition with Service Pack 2
- Windows XP Professional with Service Pack 2
- Excerpt the files on your Desktop
- Make sure you have half-dozen blank disks bachelor. You will receive this bulletin at the start run:
This program creates the Setup boot disks for Windows XP. To create these disks, you must to provide 6 bare, formatted, high-density disks. Please specify the floppy drive to copy the images to:
- Blazon the drive where your floppy disks is – case:
A:– and hit Enter - Insert the first blank deejay in the floppy drive when you receive this bulletin:
Insert ane of these disks into drive drive letter of the alphabet. This disk will become the Windows XP Setup Boot Disk. Printing whatsoever key when yous are ready.
- Continue with the process until all 6 disks are created
- Insert the starting time created deejay in the floppy drive and restart your computer
- Boot from the disk
- Go on with the instructions to begin the procedure. Make sure you have the installation CD available equally you lot're required to have it to stop a reinstallation procedure.
Yous tin besides create a bootable diskette to kicking into MS-DOS by post-obit these instructions too:
- Insert a blank diskette in your estimator's floppy disk bulldoze
- Go to My Estimator
- Right click on
A:\, this is normally the drive letter that holds the diskette - Click Format
- Check the "Create an MS-DOS startup disk" option
- Click Start

Create MS-DOS startup disk choice
If you don't have the original installation disc to create the Organization Repair disc, download our recovery disk Easy Recovery Essentials. Yous can employ it recover, repair or restore your computer:
- Download Easy Recovery Essentials from hither
- Burn the prototype. Follow these instructions on how to burn the bootable ISO image very carefully, every bit making a bootable CD can be tricky! Alternatively, these instructions explain how to create a bootable EasyRE recovery USB stick/drive.
- Select Automated Repair
- Wait for the process to terminate

EasyRE Recovery Choice screen

EasyRE Recovery Results screen
You can use Easy Recovery Essentials on Windows XP computers:
- Microsoft Windows XP SP1 (Service Pack 1)
- Microsoft Windows XP SP2 (Service Pack 2)
- Microsoft Windows XP SP3 (Service Pack iii)
It's compatible with both the Dwelling house and Professional editions of Windows XP:
- Microsoft Windows XP Habitation
- Microsoft Windows XP Professional
Click here to download Easy Recovery Essentials for Windows XP
Create disc for Windows Vista
Before y'all begin, yous demand to verify what version of Windows Vista you're running. Follow these steps:
- Get to Command Panel
- Click on System
- Nether the System blazon section, bank check if y'all run a 32-chip Windows Vista or a 64-bit Windows Vista
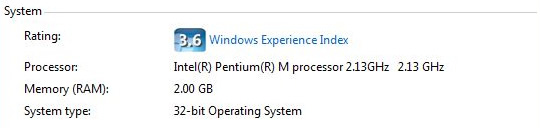
Windows Vista Arrangement Type
If yous take Windows Vista SP1 or Windows Vista SP2, you need to replace the recdisc.exe file. Otherwise, skip these steps.
Steps to replace the recdisc.exe file, if y'all have a Service Pack installed:
- Re-create a
recdisc.exefile from a Windows Vista with no Service Packs installed on your figurer - Copy the
recdisc.exefile on the Desktop - Right-click on the
recdisc.exefile and go to Properties - Go to the General tab
- Click Unblock. If "Unblock" doesn't be, skip this and the next pace.
- Click OK
- Open My Computer
- Go to
C:\Windows\System32\, whereC:\is your master hard drive's letter where Windows is installed. If it'southD:\, then you volition need to go toD:\Windows\System32\ - Correct-click the
recdisc.exefile establish in this folder (C:\Windows\System32) and brand sure that you have permissions to modify the file. To verify this, right-click on the file and go to Properties. - Go back to Desktop and copy the
recdisc.exefile from the Windows Vista with no Service Packs: right-click and Re-create. - Paste the file to the
C:\Windows\System32folder - Confirm that you lot want to supervene upon this file
Follow these steps to create the System Repair disc for a Windows Vista system:
- Go to Start
- Type
recdisc.exe - Striking Enter
- Select your DVD drive from the Bulldoze: list
- Click Create disc
- If the next screen mentions "Insert Windows installation disc", information technology means that your organisation is missing necessary files to create the disc.You will need your Windows Vista installation disc at this step. If you don't have one, go to Use Easy Recovery Essentials for Windows Vista
- Wait for the procedure to end
- When the Using the system repair disc screen appears, click Close
- Click OK
- Label your discs and keep them prophylactic!

Windows Vista – Using the organization repair screen
If you're not able to use the original installation disc to create the System Repair disc, Easy Recovery Essentials can exist used to recover, repair or restore a Windows Vista system:
- Download Easy Recovery Essentials from here
- Burn the image. Follow these instructions on how to burn the bootable ISO prototype very carefully, equally making a bootable CD can be catchy! Alternatively, these instructions explain how to create a bootable EasyRE recovery USB stick/drive.
- Select Automatic Repair
- Expect for the procedure to finish
EasyRE Recovery Choice screen
EasyRE Recovery Results screen
It supports x86 and x64 platforms and all Windows Vista editions, including the 32-fleck and 64-chip editions:
- Microsoft Windows Vista Ultimate (32-bit and 64-bit editions)
- Microsoft Windows Vista Enterprise (32-fleck and 64-flake editions)
- Microsoft Windows Vista Business (32-flake and 64-bit editions)
- Microsoft Windows Vista Home Premium (32-bit and 64-bit editions)
- Microsoft Windows Vista Home Basic (32-chip and 64-chip editions)
- Microsoft Windows Vista Starter (32-fleck edition; Starter edition doesn't accept a 64-scrap edition)
It's compatible with any of the bachelor Service Packs of Windows Vista:
- Microsoft Windows Vista Service Pack 1 (SP1)
- Microsoft Windows Vista Service Pack 2 (SP2)
Click here to download Easy Recovery Essentials for Microsoft Windows Vista
Create disc for Windows 7
The steps to create a Arrangement Repair disc for Windows 7:
- Kick your computer
- Log in as an administrator
- Insert a blank CD or DVD
- Go to Beginning
- Type
recdisc.exeand hit Enter later on. If the Create a system repair disc screen doesn't appear, follow these steps:- Open Control Panel
- Get to Fill-in and Restore
- Click on Create a system repair disc from the left
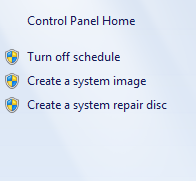
Windows 7 – Create a arrangement repair disc item
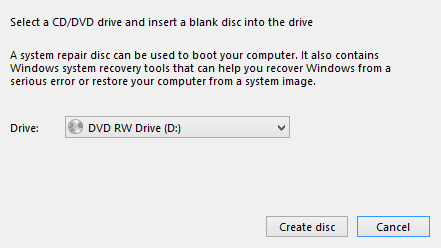
- Select the drive from the Drive: list
- Click Create disc
- Look for the process to end
- When the Using the system repair disc screen appears, click Close
- Click OK
- Label your discs
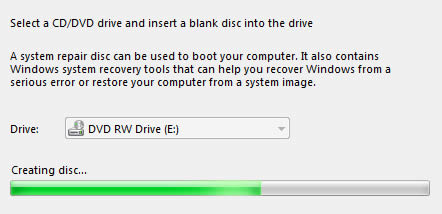
Windows seven – Create disc progress bar
If you can't boot into Windows vii to create the repair disc, employ Piece of cake Recovery Essentials. Y'all can utilize EasyRE to recover, repair or restore a Windows seven organisation:
- Download Like shooting fish in a barrel Recovery Essentials from here
- Burn down the image. Follow these instructions on how to burn down the bootable ISO image very carefully, every bit making a bootable CD can exist catchy! Alternatively, these instructions explain how to create a bootable EasyRE recovery USB stick/drive.
- Select Automatic Repair
- Expect for the process to finish
EasyRE Recovery Option screen
EasyRE Recovery Results screen
EasyRE supports both x86 and x64 platforms and is uniform with the full listing of Windows vii editions, including the 32-bit and the 64-scrap:
- Microsoft Windows 7 Ultimate (32-bit and 64-bit editions)
- Microsoft Windows 7 Enterprise (32-bit and 64-chip editions)
- Microsoft Windows 7 Professional (32-bit and 64-fleck editions)
- Microsoft Windows seven Home Premium (32-bit and 64-bit editions)
- Microsoft Windows 7 Dwelling Basic (32-scrap and 64-bit editions)
- Microsoft Windows vii Starter (32-chip edition) (Starter is available merely in 32-bit)
It's compatible with SP1 of Windows 7:
- Microsoft Windows 7 Service Pack one (SP1)
Click here to download Easy Recovery Essentials for Microsoft Windows 7
Create disc for Windows 8
You can create a System Repair disc for Windows viii past following the steps below.
Disc equally a CD/DVD
Follow these steps to create the disc on a DVD:
- Kicking your computer
- Log in as an Administrator or whatever user account with administrative rights to the system
- Afterward you log into Windows 8, insert a blank CD or DVD
- Unplug any USB flash drives from your arrangement
- Printing the
 cardinal and R key
 - Type
recdisc - Hit Enter
- If the Create a system repair window appears, skip the following steps and get to step xv. If the Create a system repair window doesn't appear, continue with the following steps until stride 15.
- Open up Control Panel
- Go to Recovery
- Click on Create a recovery drive
- If UAC (User Account Command) window appears, click Yes
- At the Create a recovery bulldoze screen, click Next
- When the Connect a USB flash drive screen appears, click on the "Create a system repair disc with a CD or DVD instead" to create the disc as a CD or DVD and not equally a USB flash drive
- Select the bulldoze of the bare CD or DVD
- Click Create disc
- Wait for the process to finish
- When the Using the system repair disc screen appears, remove your CDs/DVDs from the tray and label them accordingly

Windows 8 – Select CD for System Repair
Disc as a USB flash bulldoze
A USB bulldoze tin exist used instead of a DVD for Windows 8 users. For Windows 8.ane, merely a USB flash drive can exist used to create the disc.
Yous need a USB drive with at least 256 MB in size.
Follow these steps to create the Organisation Repair disc on Windows 8.1:
- Start Windows eight
- Press the and R key
- Blazon
RecoveryDrive.exe - Striking Enter
- If the Recovery Bulldoze window appears go along with step half-dozen. If not, follow these steps:
- Open Control Panel
- Become to Recovery
- Click on Create a recovery drive
- Click Yes, if prompted by UAC (User Account Control)
- Click Next
- At the Create a recovery drive screen, click Next.If the "Copy contents from the recovery partition to the recovery drive" pick isn't grayed out y'all tin also cheque this option which will allow the USB flash drive to be used equally a manufacturing plant restore and recovery USB drive for Windows 8.
- Select your USB bulldoze from the Available drive(s) list
- Click Adjacent
- Click Create
- Expect for the process to finish
- When it's finished, click Terminate

Windows 8 – Create disc progress bar
If you can't create a System Repair disc (either every bit DVD or USB) for your Windows eight or Windows 8.1 organisation, utilise Easy Recovery Essentials.
Easy Recovery Essentials supports the x86 and x64 platforms and all the Microsoft Windows eight editions (8 and 8.1), including the 32-bit and the 64-bit editions. It can be used to recover, repair or restore your Windows 8 computer.
- Microsoft Windows 8 (32-bit and 64-bit editions)
- Microsoft Windows viii.ane (32-bit and 64-bit editions)
- Download Easy Recovery Essentials from here
- Burn down the paradigm. Follow these instructions on how to burn the bootable ISO prototype very advisedly, as making a bootable CD can exist tricky! Alternatively, these instructions explicate how to create a bootable EasyRE recovery USB stick/drive.
- Select Automated Repair
- Look for the procedure to cease
EasyRE Recovery Option screen
EasyRE Recovery Results screen
Click to download Easy Recovery Essentials for Microsoft Windows eight
Create disc for Windows 10
You tin can create a System Repair disc for Windows 10 by post-obit the steps below.
Disc equally a CD/DVD
Follow these steps to create the disc on a DVD:
- Boot your computer
- Log in every bit an Administrator or any user account with authoritative rights to the system
- After y'all log into Windows x, insert a blank CD or DVD
- Unplug any USB wink drives from your system
- Press the key and R key
- Type
recdisc - Hit Enter
- If the Create a system repair window appears, skip the post-obit steps and go to stride xv. If the Create a system repair window doesn't appear, continue with the following steps until step fifteen.
- Open up Control Panel
- Go to Recovery
- Click on Create a recovery drive
- If UAC (User Account Control) window appears, click Yeah
- At the Create a recovery drive screen, click Next
- When the Connect a USB flash bulldoze screen appears, click on the "Create a system repair disc with a CD or DVD instead" to create the disc as a CD or DVD and non as a USB flash drive
- Select the bulldoze of the blank CD or DVD
- Click Create disc
- Await for the process to end
- When the Using the system repair disc screen appears, remove your CDs/DVDs from the tray and label them accordingly
Windows 10 – Select CD for Organization Repair
Disc as a USB wink drive
A USB drive can be used instead of a DVD for Windows 10 users.
You lot need a USB drive with at least 256 MB in size.
Follow these steps to create the Organization Repair disc on Windows 10:
- Beginning Windows 10
- Press the and R key
- Type
RecoveryDrive.exe - Hit Enter
- If the Recovery Drive window appears go along with step 6. If non, follow these steps:
- Open Command Panel
- Become to Recovery
- Click on Create a recovery drive
- Click Yes, if prompted past UAC (User Account Control)
- Click Adjacent
- At the Create a recovery drive screen, click Next.If the "Copy contents from the recovery partition to the recovery drive" option isn't grayed out you can as well bank check this choice which will allow the USB flash bulldoze to be used as a mill restore and recovery USB drive for Windows 10.
- Select your USB bulldoze from the Available bulldoze(south) listing
- Click Side by side
- Click Create
- Wait for the process to finish
- When it'southward finished, click Finish
Windows 10 – Create disc progress bar
If you tin't create a Organization Repair disc (either as DVD or USB) for your Windows 10 system, use Easy Recovery Essentials.
Piece of cake Recovery Essentials supports the x86 and x64 platforms and all the Microsoft Windows ten editions, including the 32-fleck and the 64-bit editions. Information technology can exist used to recover, repair or restore your Windows 10 computer.
- Download Easy Recovery Essentials from here
- Burn the prototype. Follow these instructions on how to burn the bootable ISO image very advisedly, as making a bootable CD can be tricky! Alternatively, these instructions explain how to create a bootable EasyRE recovery USB stick/drive.
- Select Automated Repair
- Wait for the process to finish
EasyRE Recovery Pick screen
EasyRE Recovery Results screen
Click to download Easy Recovery Essentials for Microsoft Windows ten
More Information
Support Links
- Easy Recovery Essentials for Windows – our repair and recovery disk.
It's an piece of cake-to-utilise and automated diagnostics disk. It's available for Windows 8, Windows 7 and Windows Vista. It'southward also available for Windows XP and Windows Server.
Read more at Windows Recovery Disks.
- The NeoSmart Support Forums, member-to-member technical support and troubleshooting.
- Get a discounted toll on replacement setup and installation discs: Windows XP, Windows Vista, Windows seven, Windows eight, Windows 10.
Applicable Systems
This Windows-related knowledgebase article applies to the post-obit operating systems:
- Windows XP (all editions)
- Windows Vista (all editions)
- Windows 7 (all editions)
- Windows viii (all editions)
- Windows 8.i (all editions)
- Windows x (all editions)
Propose an edit

How To Create A System Repair Cd For Windows Xp,
Source: https://neosmart.net/wiki/windows-system-repair/
Posted by: sandersonguitterotice.blogspot.com
0 Response to "How To Create A System Repair Cd For Windows Xp"
Post a Comment